A colleague got the request to add the latest modification date & modifier name to a SharePoint page.
This is convenient for users visiting the page, to see when the page is changed and by who.
I didn’t have much time (as usual) for this assignment and different options ran through my mind. At first I played a little bit with a custom page-layout where I would stuck the Modify data & modifier properties into the aspx; I quickly ran into all kinds of trouble using this option (publishing features must be on, the test O365 SharePoint site began throwing errors at me, (even after activating built-in page layouts), this was out of scope for my assignment so I quickly went out looking for other technology that could help me out!
SPServices
The SharePoint 2013 Client Side Object Model (CSOM) is one of those technology options. Another option is jQuery, SPServices is such a jQuery library. But how do you implement this? Lots of examples but little of them are in context / complete and therefore not very useable for beginners. This is one of the reasons I wanted to blog about my solution, to create a full working example that can get you started. Visit this blog on when to use the CSOM / when to use the jQuery libraries.
SPServices is an initiative from Marc. D. Anderson. Visit his site for loads of resources !
I started my journey with the SPServices “framework” which you can find here: http://spservices.codeplex.com/documentation
This codeplex project is full of usable resources and is providing most of the content of my final script. To start off you will need to reference 2 links; one to include the JQuery classes and the other one to include the SPServices classes. SPServices provides you with easy to use code that in the back talks to the SharePoint object model. This way you can create effective functions that are not available in SharePoint 2013 out of the box. For example: (all examples from the documentation part of the codeplex project with detailed info available!)
Form Enhancements/Assistance
SPCascadeDropdowns; It allows you to easily set up cascading dropdowns on a list form. (What we mean by cascading dropdowns is the situation where the available options for one column depend on the value you select in another column.) This is not possible with SharePoint OOB components!
SPDisplayRelatedInfo; This function lets you display related information on forms when an option in a dropdown is chosen.
SPLookupAddNew; This function allows you to provide a link in forms for Lookup columns so that the user can add new values to the Lookup list easily.
SPRedirectWithID; This function allows you to redirect to a another page from a new item form with the new item's ID. This allows chaining of forms from item creation onward.
SPSetMultiSelectSizes; Sets the size of the boxes in a multi-select picker based on the values they contain.
SPArrangeChoices; Rearranges radio buttons or checkboxes in a form from vertical to horizontal display to save page real estate.
SPAutocomplete; The SPAutocomplete lets you provide values for a Single line of text column from values in a SharePoint list. The function is highly configurable and can enhance the user experience with forms.
SPUpdateMultipleListItems; SPUpdateMultipleListItems allows you to update multiple items in a list based upon some common characteristic or metadata criteria.
SPFilterDropdown; The SPFilterDropdown function allows you to filter the values available in a Lookup column using CAML against the Lookup column's source list.
SPComplexToSimpleDropdown; Converts a "complex" dropdown (which SharePoint displays if there are 20+ options) to a "simple" dropdown (select).
SPFindPeoplePicker; The SPFindPeoplePicker function helps you find and set People Picker column values.
SPFindMMSPicker; The SPFindMMSPicker function helps you find an MMS Picker's values.
Utilities
SPGetCurrentSite; This utility function, which is also publicly available, simply returns the current site's URL. It mirrors the functionality of the WebUrlFromPageUrl operation.
SPGetCurrentUser; This function returns information about the current user. It is based on an insightful trick from Einar Otto Stangvik.
SPGetLastItemId; Function to return the ID of the last item created on a list by a specific user. Useful for maintaining parent/child relationships.
SPGetDisplayFromStatic; This function returns the DisplayName for a column based on the StaticName.
SPGetStaticFromDisplay; This function returns the StaticName for a column based on the DisplayName.
SPScriptAudit; The SPScriptAudit function allows you to run an auditing report showing where scripting is in use in a site.
SPGetQueryString; The SPGetQueryString function returns an array containing the Query String parameters and their values.
SPListNameFromUrl; Returns the current list's GUID *if* called in the context of a list, meaning that the URL is within the list, like /DocLib or /Lists/ListName.
SPFilterNode; Can be used to find namespaced elements in returned XML, such as rs:data or z:row from GetListItems.
SPXmlToJson; SPXslToJson is a function to convert XML data into JSON for client-side processing.
SPConvertDateToISO; Convert a JavaScript date to the ISO 8601 format required by SharePoint to update list items.
SPGetListItemsJson; SPGetListItemsJson combines several SPServices capabilities into one powerful function. By calling GetListItemChangesSinceToken, parsing the list schema, and passing the resulting mapping and data to SPXmlToJson automagically, we have a one-stop shop for retrieving SharePoint list data in JSON format. No manual mapping required!
SPDropdownCtl; The function finds a dropdown in a form based on the name of the column (either the DisplayName or the StaticName) and returns an object you can use in your own functions.
The solution:
First of all creating a script; Then adding the script to a page where you want to display the page’s properties. This way, users can still edit the page content without messing with the script code. The code can be inserted into a script editor webpart or in a content editor webpart, depending on your situation you can also upload the script to a resource library and link the content editor webpart to your script. This way users won’t see the script at all, you can modify the script on 1 location and without the need to edit your page.
The script:
The script I put together looks like this; I’ve added some comments in there to explain what’s going on:
<!-- Reference jQuery on the Google CDN (content delivery network), if you want to make an external link to the (for this script correct) jquery library -->
<script type="text/javascript" src="//ajax.googleapis.com/ajax/libs/jquery/1.11.0/jquery.min.js"></script>
<!-- Alternatively Reference jQuery on the locale Site Assets , uncomment to activate and comment out the above one to deactivate the CDN method-->
<!--<script type="text/javascript" src="https://<yoursite>.sharepoint.com/SiteAssets/jquery.min.js"></script>-->
<!-- Reference SPServices on cdnjs (Cloudflare) if you want to make an external link to the (for this script correct) SPServices library -->
<script type="text/javascript" src="//cdnjs.cloudflare.com/ajax/libs/jquery.SPServices/2014.01/jquery.SPServices.min.js"></script>
<!-- Alternatively Reference jQuery on the locale Site Assets, uncomment to activate and comment out the above one to deactivate the CDN method -->
<!--<script type="text/javascript" src="https://michindusinc.sharepoint.com/SiteAssets/jquery.SPServices.min.js"></script>-->
<script language="javascript" type="text/javascript">
<!—A little helper to format the date like you would like it, in this case.. Dutch formatting-->
function SPConvertDate(t)
{
var d = new Date(t.substr(0,4), parseInt(t.substr(5,2)) - 1, t.substr(8,2), t.substr(11,2), t.substr(14,2), t.substr(17,2));
var month = ((d.getMonth()+1) < 10) ? "0" + (d.getMonth()+1) : (d.getMonth()+1);
var date = (d.getDate() < 10) ? "0" + d.getDate() : d.getDate();
var minutes = (d.getMinutes() < 10) ? "0" + d.getMinutes() : d.getMinutes();
var amPm = (d.getHours() < 12) ? "am" : "pm";
return date + "-" + month + "-" + d.getFullYear() + " " + d.getHours() + ":" + minutes+amPm;
}
<!—here starts the main programà
$(document).ready(function() {
<!—here you can populate the only 2 parameters; the list-name where the page resides and the page ID of the page you want to show the modified date for; I’m using the pageID to prevent disfunction of the script if someone decides to rename a page ..à
var ListName = "2AAC79F6-98B3-45D4-BD77-EDE404B99C39"
var PageID = "3"
<!—then we define our query that will filter all pages in the list to the one we would like to show. Of course you can modify this query and even show multiple pages information. Via these methods we can access all properties / metadata from a SharePoint page, you just need to know the column names and ways to extract it; another nice thing is that it’s a query, which is familiar to a lot of people!à
var CamlQuery = "<Query><Where><Eq><FieldRef Name='ID'/><Value Type='Number'>" + PageID + "</Value></Eq></Where></Query>";
<!—Then we define which fields (metadata) we would like to extract and show in our page à
var CamlViewFields = "<ViewFields><FieldRef Name='Title' /><FieldRef Name='Modified' /><FieldRef Name='Author' /></ViewFields>";
<!—now let’s build and execute our query à
$().SPServices({
operation: "GetListItems",
async: false,
listName: ListName,
CAMLViewFields: CamlViewFields,
CAMLQuery: CamlQuery,
completefunc: function (xData, Status) {
<!—we’re getting a XML back, let’s get our data out of it and fill some variables with the dataà
$(xData.responseXML).SPFilterNode("z:row").each(function() {
var Author = new String($(this).attr("ows_Author"));
Author = Author.split(";#")[1]
ModifiedDate = $(this).attr("ows_Modified")
<!—making a liHtml variable which in this specific case I turned into a DIV type later, if you want to display more than one pages’ info, you might want to construct an <li>info</li> kind of html à
var liHtml = "Latest update: " + SPConvertDate(ModifiedDate) + " <br>By: " + Author;
$("#tasksUL").append(liHtml);
});
}
});
});
</script>
<!—and then display your html à
<h1>Page properties:</h1><br/>
<div id="tasksUL"/>
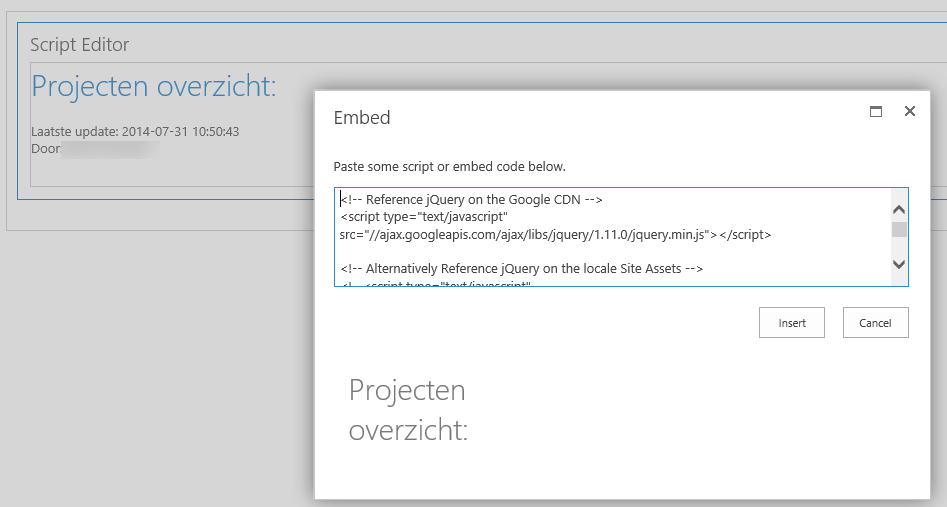
Ok, we’ve got our script.. Now what? Let’s insert it into a web part and see if it works, the end result:
First, we add a script editor or content editor web part to the page;
Then add the script into it and save it.
Now we can add other content to the page, when the page is saved the info updates automatically!
You can download the script here:


